guides
How to Froth Milk at Home
Step-by-step guide to frothing milk at home using a steam wand, electric frother, or handheld wand. Which milk works best and common mistakes.
The best way to froth milk at home is with an espresso machine steam wand: hold a cold pitcher at a slight angle, keep the tip just below the surface to inject air for 3-5 seconds, then lower the tip to heat the milk to 140-150°F while swirling. For cafe-quality results without a machine, an electric frother like the Nespresso Aeroccino 4 comes closest — a handheld wand works for basic foam in a pinch.
Which frothing method are you using?
There are four common ways to froth milk at home, and the right choice depends on what equipment you already have:
| Method | Equipment needed | Foam quality | Best for |
|---|---|---|---|
| Steam wand | Espresso machine with wand | Excellent microfoam | Lattes, cappuccinos, flat whites |
| Electric frother | Standalone frother ($30-100) | Very good | Any milk drink without an espresso machine |
| Handheld frother | Handheld wand ($10-15) | Large, airy bubbles | Cappuccino-style foam, no latte art |
| French press | French press coffee maker | Decent foam | No other tools available |
The sections below cover each method step by step.
How to froth milk with a steam wand
This is the method used in every coffee shop. It produces true microfoam — dense, glossy textured milk that integrates fully with espresso. The technique has two distinct phases: the aeration phase (injecting air) and the heating phase (swirling to temperature).
What you need
- Stainless steel milk pitcher sized for your drink: 12 oz for a single cappuccino or latte, 20 oz for two drinks. The taper of the spout matters for pouring control, but any pitcher works for learning.
- Thermometer (optional but helpful for beginners): a probe thermometer clipped to the pitcher removes guessing. Once your palm calibration is reliable, it becomes optional.
- Cold milk, cold pitcher: remove both from the refrigerator just before steaming. Cold milk gives you more texture time before hitting temperature.
Best for steam wand milk texturing and latte art
Rattleware 12 oz Latte Art Milk Pitcher
A good pitcher shapes how the milk moves during steaming and pours during latte art. The Rattleware 12 oz has the right taper for control and is the same pitcher used in thousands of coffee shops. At around $20 it is a lifetime purchase that makes steaming easier from your first session.
★★★★★ 4.7 · 4,100 reviews
Check prices on Amazon→Step-by-step: steam wand milk frothing
-
Purge the steam wand. Before putting it in milk, open the valve for 1-2 seconds to expel condensed water from the wand tip. Point the wand into the drip tray or a cloth to catch the water. Condensed water in milk creates large bubbles and dilutes the texture.
-
Fill the pitcher with cold milk to just below the base of the spout. For a single latte: about 6 oz of milk in a 12 oz pitcher. Milk expands 30-50% during steaming, so underfilling is better than overfilling.
-
Position the wand tip just below the milk surface — about 1/4 inch in. Hold the pitcher at a slight angle so the wand sits off-center, near the inner wall. When steam activates, this position creates a downward vortex that incorporates air evenly.
-
Open the steam valve fully and start the aeration phase. For 3-5 seconds, keep the tip near the surface. You should hear a gentle paper-tearing or hissing sound — this is air entering the milk. A loud screaming usually means the tip is above the surface. Silence means the tip is too deep and you are heating without aerating.
-
Submerge the tip and heat. Lower the pitcher slightly so the tip is 1-2 inches below the surface. Now you are heating and swirling, not aerating. The vortex continues on its own from the steam flow. Keep the pitcher moving in small circles to maintain the swirl.
-
Stop at 140-150°F. If using a thermometer, watch for 140°F and close the valve. By feel: when the pitcher becomes uncomfortably hot to hold — about 5-7 seconds after it first feels warm — stop immediately. Carry-over heat will push the milk another 5-10°F. Above 160°F, milk proteins break down and the foam becomes thin and bubbly.
-
Tap and swirl. After steaming, close the valve, remove the pitcher, and give it a firm tap on the counter to pop any large surface bubbles. Swirl the pitcher for 15-20 seconds until the milk looks glossy and paint-like with no visible large bubbles. If it still looks fluffy, keep swirling — the goal is integration, not separation.
-
Pour immediately. Textured milk separates back into liquid and foam within 30-60 seconds. Pull your espresso shot during steaming, or steam first and pull the shot right after, then pour before the milk separates.
-
Wipe the steam wand immediately. While milk is still wet, wipe the wand with a dedicated damp cloth, then give a 1-second steam purge to clear milk from inside the tip. Dried milk in the steam holes requires soaking to remove.
Reading your results
Milk looks stiff and fluffy like whipped cream: Too much air. The aeration phase ran too long. Reduce it to 2-3 seconds and submerge sooner next time.
Milk is watery with large bubbles floating on top: Too little air, or aeration happened at too low a temperature. Start with colder milk so you have more time in the aeration phase before hitting target temp.
Pitcher got hot before the milk expanded noticeably: Tip was too deep from the start — heating without aerating. The positioning in step 3 is the critical fix.
Milk tastes scorched: Temperature went above 160°F. Stop steaming earlier and check your thermometer calibration.
How to froth milk with an electric frother
Electric milk frothers are standalone appliances that heat and froth milk automatically. They are the best solution for Nespresso, AeroPress, or drip coffee setups and produce quality much closer to a steam wand than a handheld frother.
Step-by-step: electric frother
-
Pour cold milk into the frother up to the marked fill line. Most frothers have two lines: one for frothed milk (lower) and one for heated milk without much foam (higher). For cappuccino-style foam, use the lower line.
-
Select your froth setting. Most electric frothers offer hot dense foam, hot light foam, or heat-only modes.
-
Press start. The internal whisk spins automatically and the heating element activates. Most models finish in 60-90 seconds.
-
The frother signals when finished. Pour immediately — electric-frothed milk holds texture for about 2 minutes before separating.
Best for consistently frothed milk without an espresso machine
Nespresso Aeroccino 4 Milk Frother
The Aeroccino 4 is the best standalone electric frother for home use. It offers four modes: hot dense foam for cappuccino, hot light foam for latte, hot milk only, and cold foam for iced drinks. The non-stick interior cleans in seconds under the tap. At around $70-80 it is the most refined Aeroccino yet, and the results are noticeably better than cheaper induction frothers.
★★★★★ 4.6 · 12,800 reviews
Check prices on Amazon→Best for high-volume households wanting adjustable temperature control
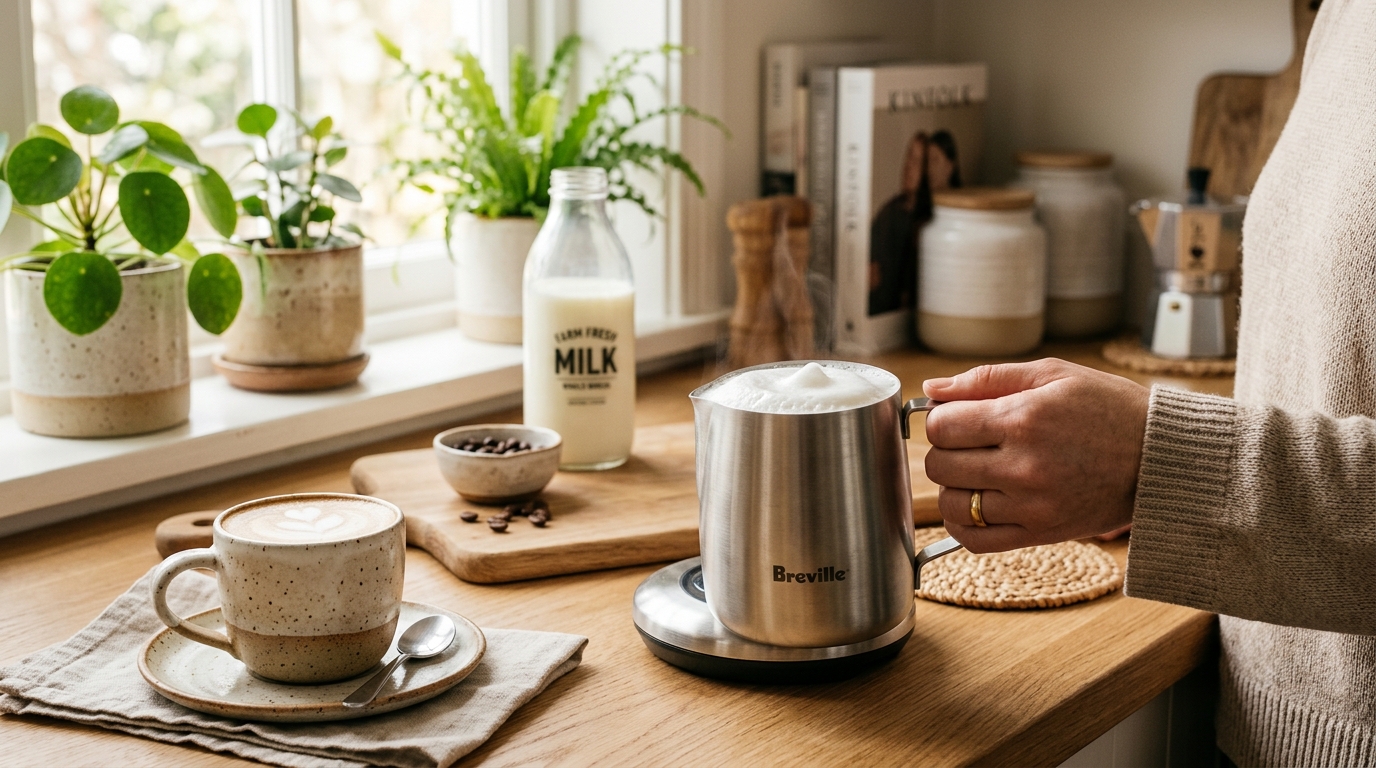
Breville BMF600XL Milk Cafe Frother
The Breville Milk Cafe holds up to 3 cups of milk and offers adjustable temperature from 100-160°F via a dial, plus a separate froth density dial. Overkill for a single daily latte, but ideal for making multiple drinks or dialing in exactly how much foam your cappuccino gets. Produces excellent microfoam-adjacent texture at its lowest froth setting.
★★★★★ 4.5 · 6,300 reviews
Check prices on Amazon→How to froth milk with a handheld frother
A handheld milk frother — also called a milk wand or froth wand — is a battery-powered whisk on a stick. It costs $10-15, works in any mug, and produces serviceable foam. The bubbles are larger and less integrated than steam wand or electric frother foam, but it is the best entry-level option and a solid travel tool.
Step-by-step: handheld frother
-
Heat the milk first in a microwave or small saucepan to around 130-150°F. A handheld frother generates no heat — it only aerates. Frothing cold milk and then microwaving destroys the foam.
-
Pour heated milk into a tall mug or glass. The taller the container, the more room for the whisk to create a vortex.
-
Submerge the whisk head just below the surface. Tilt the frother at a slight angle so the whisk creates a circular current.
-
Turn on the frother and move it slowly in small circles for 20-30 seconds. Do not hold it stationary — the motion incorporates more air and creates more consistent foam.
-
Tap the mug on the counter to collapse the largest bubbles and pour immediately.
Best for entry-level foam with no equipment investment
Powerlix Handheld Milk Frother
The Powerlix is the most popular handheld frother on Amazon for good reason — it is fast, produces decent foam in under 30 seconds, runs on two AA batteries, and costs around $10. It does not produce the dense microfoam of a steam wand, but for cappuccino-style foam on a drip or pod drink it does the job. The whisk head is replaceable if it bends.
★★★★☆ 4.4 · 48,000 reviews
Check prices on Amazon→How to froth milk with a French press
No dedicated frothing tool? A French press can produce decent foam with heated milk. Fill the press about one-quarter full with milk heated to 140°F, then pump the plunger up and down vigorously 20-30 times. The mesh plunger aerates the milk in much the same way a whisk does. Tap the press on the counter and spoon the foam out. It is slow and produces inconsistent bubble size, but it works when nothing else is available.
Which milk froths best?
Milk type makes a bigger difference than most people expect. The proteins and fats in milk determine how well it forms and holds foam.
| Product | Best for | Rating | Notes | |
|---|---|---|---|---|
| Whole milk | Best overall | ★★★★★ | Richest foam, creamiest texture, easiest to steam — the standard in every coffee shop | — |
| 2% reduced fat | Good balance | ★★★★☆ | Slightly lighter than whole milk but nearly as easy; good for everyday lattes | — |
| Skim milk | Large stiff foam | ★★★☆☆ | Creates more volume but bubbles are larger and less stable; tastes thin | — |
| Oat milk (barista) | Best dairy-free option | ★★★★☆ | Barista editions from Oatly, Califia, and Minor Figures steam nearly like whole milk | — |
| Almond milk | Subtle nuttiness | ★★☆☆☆ | Produces thin foam that separates quickly; barista formulas improve this significantly | — |
| Soy milk | Neutral flavor | ★★★☆☆ | Froths reasonably well but can curdle with acidic espresso; barista versions help | — |
| Coconut milk | Rich sweet flavor | ★★☆☆☆ | Inconsistent foam; the fat separates unpredictably and is hard to steam evenly | — |
Key rule for non-dairy milks: always buy the barista-edition or barista-blend version if available. Standard oat or almond milk contains additives that suppress foam and can curdle on contact with hot espresso. Barista formulas add fat emulsifiers and are pH-balanced to prevent curdling.
Common frothing mistakes
Not purging the steam wand before inserting it into milk. The first burst of steam contains condensed water from the wand sitting idle. That water blast creates large bubbles and dilutes the milk. Purge every single time — it takes two seconds.
Starting with warm milk. Warmer milk hits your target temperature faster, leaving less time for aeration. Cold milk from the refrigerator gives you the full window to inject air before the milk reaches 140°F.
Keeping the steam tip too high. The tip above the milk surface creates loud spattering and large surface bubbles instead of integrated microfoam. The tip should always be submerged — the question is only how deep.
Heating past 160°F. Milk sugars and proteins behave differently above 160°F. The foam becomes thin, watery, and slightly scorched tasting. If you regularly overshoot, use a clip-on thermometer until your feel for temperature is calibrated.
Not swirling after steaming. The swirling step integrates large bubbles into the milk. Skip it and the milk pours as separate liquid and foam layers. Swirl until the surface looks glossy and no large bubbles are visible.
FAQ
Frequently asked questions
Can I re-froth milk that has already been steamed?
Why is my foam disappearing before I finish pouring?
How do I froth oat milk without it curdling?
What temperature should steamed milk be for a latte?
Do I need a special pitcher for steaming milk?
Why does my milk smell burnt even when I stopped at the right temperature?
Bottom line
Frothing milk at home is a learnable skill that dials in over a few sessions, not months. With a steam wand: start cold, inject air for 3-5 seconds near the surface, submerge and heat to 140-150°F, and swirl until glossy. Without a steam wand, an electric frother like the Nespresso Aeroccino 4 produces the best results — a handheld frother works as a low-cost entry point. Whole milk is the easiest to work with; for dairy-free, always choose the barista-edition version of oat or almond milk.
For more: how to pull a perfect espresso shot, the home espresso setup guide, best milk frothers, and best milk pitchers.